
Replanting a cactus involves careful planning and execution to ensure the plant’s health and growth. Start by choosing the right pot with proper drainage and a suitable soil mix designed for cacti. Handle the cactus gently, using gloves to protect your hands from spines. Inspect and prune the roots before placing the cactus in its new pot. After replanting, water sparingly and provide the right environment with adequate light and temperature. Monitor the cactus for signs of stress or new growth, adjusting care as needed.
Avoid common mistakes like overwatering and using the wrong soil. With patience and attention, your cactus will thrive in its new home.
Understanding Cacti
Cacti are fascinating plants known for their unique adaptations and striking appearances. Understanding their various types and growth patterns is essential for caring for them properly.
Types of Cacti
Cacti come in a wide range of species, each with distinctive features. Here are some common types:
- Barrel Cactus: Recognized by their ribbed, cylindrical shape, these cacti are often found in desert landscapes. They can store significant amounts of water, making them highly drought-resistant.
- Prickly Pear: This type features flat, paddle-like segments and produces edible fruits called tunas. Prickly pears are versatile and can thrive in various climates.
- Saguaro: Iconic in the American Southwest, saguaros are tall, tree-like cacti that can live for over 150 years. They have a distinctive arm-like branching pattern.
- Christmas Cactus: Unlike typical desert cacti, Christmas cacti are native to tropical rainforests and bloom around the holiday season, displaying vibrant flowers.
- Golden Barrel: With its rounded shape and striking golden spines, the golden barrel cactus is a popular ornamental plant that can reach up to three feet in diameter.
Read to know more: How Often Does A Cactus Flower Bloom: A Comprehensive Guide
Growth Patterns of Cactus

Cacti exhibit unique growth patterns adapted to their arid environments:
- Slow Growth: Most cacti grow slowly, which helps them conserve water and survive in harsh conditions. Some can take years to reach maturity.
- Water Storage: Cacti have specialized tissues that store water, allowing them to survive prolonged droughts. Their thick, fleshy stems are a vital characteristic.
- Spine Development: Instead of leaves, cacti have spines that reduce water loss and provide protection from herbivores. Spines also help shade the plant from intense sunlight.
- Root Systems: Cacti have extensive root systems that spread close to the surface, enabling them to quickly absorb any available moisture from light rains.
- Seasonal Growth Spurts: While growth is generally slow, cacti can have growth spurts during increased rainfall or favorable conditions.
To know More: Handling and Care Tips: Are Cactuses Poisonous?
Importance of Replanting Cactus
Replanting cacti is crucial for their health and longevity. As cacti grow, they can outgrow their pots, leading to root binding and poor soil conditions. This can hinder their growth and make them more susceptible to diseases. Replanting provides an opportunity to refresh the soil, ensuring it remains well-draining and nutrient-rich, which is essential for cacti. It also allows for inspection and pruning of the roots, removing any dead or diseased. Additionally, Replanting can stimulate growth by giving the cactus more space to expand. Regular Replanting helps maintain a healthy root system, promotes robust growth, and ensures your cactus thrives in its environment.
Benefits of Proper Replanting
Proper replanting of cacti offers several significant benefits, ensuring your plant remains healthy and vibrant. Here are the key advantages:
- Enhanced Growth: Replanting provides the cactus with fresh, nutrient-rich soil, promoting robust growth. The cactus can develop more efficiently as the roots have more space to spread out.
- Improved Root Health: During Replanting, you can inspect and prune the roots, removing dead or diseased parts. This prevents root rot and other issues, fostering a healthier root system.
- Better Drainage: Using the appropriate soil mix and a well-draining pot ensures excess water doesn’t accumulate, reducing the risk of overwatering and root rot, which are common issues for cacti.
- Pest and Disease Prevention: Replanting allows you to check for pests and diseases lurking in the old soil. Fresh soil and a clean pot minimize the risk of infections and infestations.
- Optimal Growth Conditions: A new pot gives the cactus more space to grow, preventing it from becoming root-bound. This space allows the cactus to absorb nutrients and water more effectively.
- Aesthetic Appeal: Replanting in a new pot can enhance the visual appeal of your cactus and its surroundings, making it a more attractive feature in your home or garden.
When to Replant a Cactus
Replanting a cactus at the right time is crucial for its health and continued growth. Key indicators that your cactus needs Replanting include roots growing out of the drainage holes, becoming root-bound, or the cactus becoming too top-heavy for its current pot. Additionally, it’s time to replant if the soil has become compacted, depleted of nutrients, or too salty from fertilizer buildup; poor drainage is another sign that the roots may be at risk of rot. if water isn’t draining correctly, Replanting helps provide fresh soil, better aeration, and more stability for the cactus, ensuring it can absorb nutrients effectively and continue thriving.
The best time to replant a cactus is during its active growing season, typically between late spring and early summer. During this period, cacti are more resilient and can recover quickly from the stress of Replanting. Avoid replanting during the winter dormancy period, as cacti are less active and more susceptible to stress, making recovery slower and more challenging. Paying attention to these signs and timing your replanting efforts during the growing season ensures your cactus adapts well to its new environment and continues to thrive.
Choosing the Right Pot
The appropriate pot for your cactus is essential for its health and growth. The pot size and material significantly impact the plant’s well-being. Choose a pot slightly larger than the current one, allowing for development but not so large that it retains excess moisture, which can lead to root rot. Materials like terracotta are excellent because they are porous and allow for better air circulation, preventing soil waterlogging. However, plastic pots can also be used effectively if they have sufficient drainage holes.
Drainage is a critical factor when choosing a pot for your cactus. Ensure the pot has adequate drainage holes to allow excess water to escape, preventing water from accumulating at the bottom and causing root rot. You can also add a layer of gravel or small stones at the bottom of the pot to improve drainage further. Remember, a well-draining pot combined with the right soil mix will provide an optimal environment for your cactus to thrive. Selecting the right pot ensures your cactus has the best chance for healthy growth and longevity.
How Selecting the Right Soil
Choosing the suitable soil is crucial for the health and growth of your cactus. Cacti naturally thrive in environments with well-draining soil, which prevents excess moisture from causing root rot. Regular potting soil retains too much water and is not suitable for cacti. Instead, opt for a cactus-specific soil mix or create your blend using ingredients like coarse sand, perlite, and regular potting soil. This combination ensures the soil drains quickly and provides the aeration needed for healthy root development.
The right soil mix also helps mimic the natural desert conditions that cacti are adapted to. A well-draining soil prevents water from pooling around the roots, which can lead to fungal infections and other issues. Additionally, incorporating perlite and pumice into the soil mix can improve its structure and keep it loose, allowing roots to grow more freely. By selecting the appropriate soil, you create an optimal environment for your cactus to absorb nutrients efficiently, stay healthy, and thrive.
How To Preparing to Replant
Gathering Necessary Tools
You’ll need:
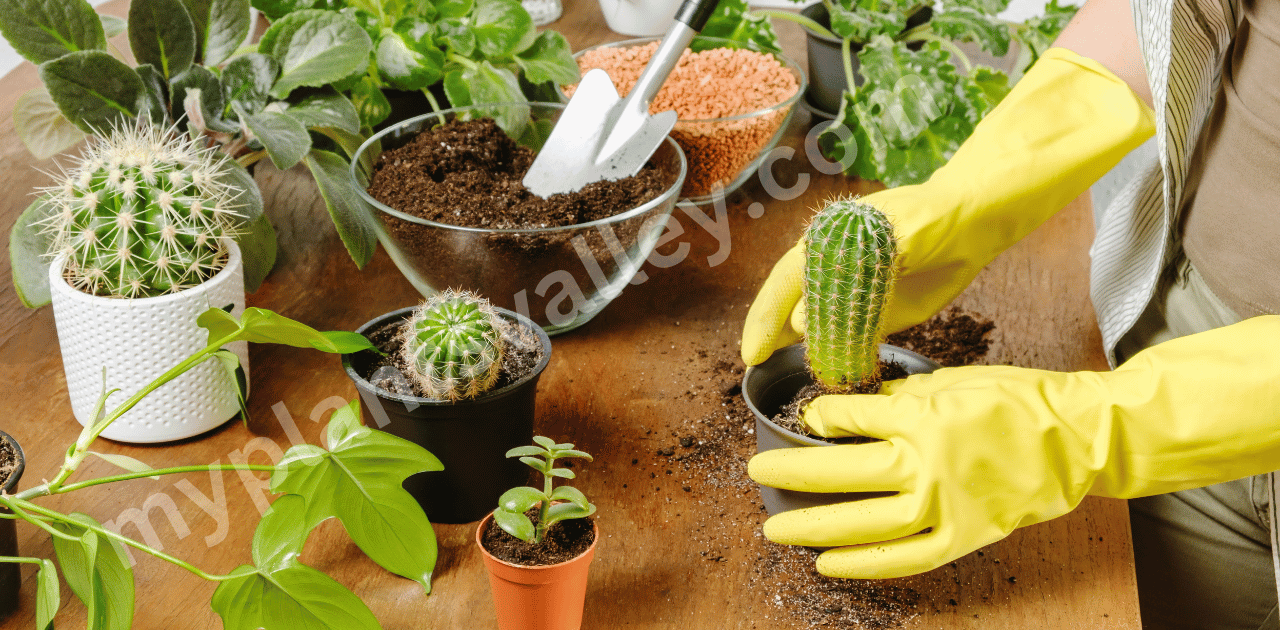
- Gloves (preferably thick and sturdy)
- A trowel
- Fresh cactus soil
- A new pot
- A watering can
- Newspaper or a tarp (to catch loose soil)
Safety Precautions
While replanting your cactus can be an enjoyable and rewarding task, it’s essential to take some safety precautions to protect yourself and your plant:
- Wear Gloves: Always wear gloves when handling cacti to shield your hands from the sharp spines. Thick, durable gloves provide the best protection.
- Handle With Care: Exercise caution when handling the cactus to avoid accidentally pricking yourself or damaging the plant. Use a gentle touch and avoid squeezing or pressing too hard.
- Use Proper Tools: Use the appropriate tools, such as a trowel or tongs, to handle the cactus and soil. This reduces the risk of injury and ensures a smooth replanting process.
- Work in a Well-Lit Area: Choose a well-lit area so you can clearly see what you’re doing. This helps prevent accidents and ensures precision during the replanting process.
Removing the Cactus from Its Current Pot
Once you’ve gathered all the necessary tools and taken safety precautions, it’s time to tackle the first step of the replanting process: removing the cactus from its current pot. This step requires patience and care to avoid damaging the cactus or injuring yourself.
Step 1: Prepare the Work Area
Before you begin, ensure you have a clean and spacious work area to maneuver the cactus. Lay down a newspaper or a tarp to catch any soil or debris that may fall during the process.
Step 2: Loosen the Soil
Gently tap the sides of the current pot to loosen the soil around the cactus. If the cactus is firmly rooted, use a trowel or small shovel to carefully loosen the soil around the edges of the pot.
Step 3: Remove the Cactus
Once the soil is loosened, grasp the cactus firmly but gently near the base. If the cactus has spines, use tongs or a folded newspaper to protect your hands from injury.
Step 4: Support the Cactus
As you lift the cactus out of the pot, support the base of the plant to prevent it from bending or breaking. Hold the cactus steady as you gently lift it upward, using your other hand to support the bottom of the pot if necessary.
Step 5: Inspect the Roots
Once the cactus is removed from its pot, inspect the roots for signs of damage, rot, or pests. Trim away any unhealthy or overgrown roots using sterilized scissors or pruning shears.
Step 6: Shake Off Excess Soil
Gently shake off any excess soil clinging to the cactus’s roots. Avoid pulling or tugging on the roots, as this can damage the plant.
Step 7: Set Aside
Once the excess soil has been removed, set the cactus aside safely while you prepare its new home. Do not place it in direct sunlight or expose it to extreme temperatures during this time.
Inspecting and Pruning the Roots
After successfully removing your cactus from its current pot, the next crucial step in Replanting is inspecting and pruning the roots. This step ensures your cactus’s overall health and vitality as it transitions to its new home.
Step 1: Assess Root Health
Take a close look at the roots of your cactus to assess their overall health. Look for signs of rot, damage, or overcrowding, which can hinder the plant’s growth and development.
Step 2: Trim Damaged or Diseased Roots
Using sterilized scissors or pruning shears, carefully trim away any damaged, rotting, or diseased roots. Cut back to healthy tissue, making clean, diagonal cuts to minimize stress on the plant.
Step 3: Remove Overcrowded Roots
If your cactus’s roots are tightly packed or overcrowded, gently tease them apart using your fingers or a small tool. This will allow for better airflow and nutrient absorption, promoting healthier growth.
Step 4: Prune Excessively Long Roots
If your cactus has excessively long roots, consider pruning them to encourage a more compact root system. Trim back any overly long or rambling roots, focusing on maintaining a balanced root-to-top ratio.
Step 5: Dust with Rooting Hormone (Optional)
To protect against root rot and promote root growth, you may dust the freshly trimmed roots with a rooting hormone powder. This helps stimulate root development and enhances the cactus’s ability to establish itself in its new environment.
Step 6: Allow Roots to Dry
After pruning, allow the roots of your cactus to air dry briefly. This helps seal the cuts and reduces the risk of infection or rot when replanting.
Step 7: Proceed with Replanting
Once the roots have dried slightly, you can replant your cactus in its new pot, following the steps outlined in the replanting guide.
Preparing the New Pot
Properly preparing the new pot is essential before you transfer your cactus to its new home. This step ensures optimal growing conditions and provides a fresh start for your plant in its new environment.
Step 1: Choose the Right Size Pot
Select a new pot slightly larger than the current one to accommodate the cactus’s growth. Ensure the pot has drainage holes at the bottom to prevent waterlogging, which can lead to root rot.
Step 2: Clean the Pot
Before adding soil, clean the new pot thoroughly with soap and water to remove any dirt, dust, or debris. Rinse it well and allow it to dry completely before proceeding.
Step 3: Add Drainage Material
Add a layer of gravel, small stones, or broken pottery shards to the base of the pot to enhance drainage and prevent water accumulation at the bottom. This helps prevent root rot by allowing excess water to drain away freely.
Step 4: Fill with Cactus Soil Mix
Fill the pot with a well-draining cactus soil mix, leaving enough space at the top for the cactus and its roots. Avoid using regular potting soil, as it retains too much moisture, which can harm cacti.
Step 5: Level the Soil
Gently pat down the soil to create a level surface, ensuring the cactus will sit securely once planted. Avoid compacting the soil too tightly, as this will hinder root growth and drainage.
Step 6: Create a Planting Hole
Using your fingers or a small tool, create a planting hole in the center of the soil deep enough to accommodate the cactus’s roots. Make sure the hole is large enough to comfortably fit the entire root system.
Step 7: Proceed with Replanting
With the new pot prepared and the soil in place, you’re now ready to transfer your cactus into its new home. Follow the steps outlined in the replanting guide to carefully transplant the cactus and ensure its continued health and vitality.
Replanting the Cactus

With the new pot prepared, it’s time to replant your cactus. This step is crucial for ensuring your cactus establishes itself well in its new environment. Follow these steps to replant your cactus successfully:
Step 1: Position the Cactus
Carefully place the cactus into the planting hole you created in the new pot. Hold the cactus by its base or use tongs or a folded piece of newspaper to avoid the spines pricking it.
Step 2: Adjust the Cactus
Position the cactus in the pot’s center, ensuring it stands upright. Adjust the depth of the planting hole as needed to keep the cactus at the same soil level it was in its previous pot.
Step 3: Backfill with Soil
Gently backfill the hole with the cactus soil mix, adding small amounts. Use your fingers or a small tool to distribute the soil evenly around the roots. Be careful not to pack the soil too tightly, which can impede drainage and root growth.
Step 4: Firm the Soil
Once the cactus is in place, gently firm the soil around the base of the plant to secure it. This helps eliminate air pockets and ensures good contact between the roots and the soil.
Step 5: Water Sparingly
After replanting:
- Refrain from watering the cactus immediately.
- Allow the plant to acclimate to its new environment for a few days to reduce the risk of root rot.
- Once the acclimation period is over, water the cactus lightly, allowing the soil to dry out completely between waterings.
Step 6: Place in an Ideal Location
Position the newly replanted cactus in a location with plenty of indirect sunlight. Ensure the area has good air circulation, and avoid placing the cactus in direct sunlight until it has adjusted to its new pot.
Step 7: Monitor the Cactus
For the first few weeks after replanting, keep a close eye on your cactus. Look for signs of stress, such as wilting, discoloration, or soft spots, and adjust your care routine as needed.
Watering After Replanting
Watering your cactus after Replanting is a delicate process that requires careful attention to avoid overwatering and ensure the plant’s health. Here’s a detailed guide on how to properly water your cactus after Replanting:
Step 1: Wait Before Watering
After replanting your cactus, waiting a few days before the first watering is crucial. This waiting period allows the roots to heal from any damage incurred during replanting and reduces the risk of root rot.
Step 2: Initial Watering
When it’s time for the initial watering, water the cactus lightly. Use a watering can with a narrow spout to control the amount of water and avoid overwatering. Ensure the soil is moistened evenly, but do not saturate it.
Step 3: Allow Soil to Dry
After the initial watering, allow the soil to dry out completely before watering again. Cacti thrive in dry conditions, and their roots are susceptible to rot if left in damp soil for too long.
Step 4: Establish a Watering Routine
Establish a consistent watering routine based on the needs of your specific cactus species and the environmental conditions. Generally, watering once every two to three weeks is sufficient for most cacti. In hotter, drier conditions, you may need to water more frequently, while in more relaxed, humid environments, you may water less often.
Step 5: Monitor Soil Moisture
Regularly check the soil moisture level by inserting your finger about an inch into the soil. If it feels dry, it’s time to water. If it still feels moist, wait a few more days before checking again.
Step 6: Use Appropriate Water
When watering your cactus, use room-temperature water. Avoid using cold water, as it can shock the roots. If possible, use rainwater or distilled water to prevent the buildup of minerals and chemicals found in tap water.
Step 7: Avoid Overwatering
Overwatering is one of the most common mistakes made with cacti. Always err on the side of underwatering rather than overwatering. Cacti are drought-tolerant plants that store water in their tissues and can survive for longer periods without water.
Step 8: Observe Plant Health
Monitor your cactus for signs of overwatering, such as yellowing, soft spots, or a mushy appearance. If you notice these signs, reduce watering frequency and ensure the pot has proper drainage.
Providing the Right Environment
Creating the optimal environment for your cactus is crucial for its health and growth. Here’s how to ensure your cactus thrives in its new home:
Step 1: Light Requirements
Place in Bright, Indirect Light
Cacti need plenty of light to grow well. Position your cactus where it will receive bright, indirect sunlight for several hours each day. A south- or east-facing window is ideal. Direct sunlight can be too intense and may cause the plant to scorch, especially if it’s adjusting to a new environment.
Step 2: Temperature
Maintain Ideal Temperature Ranges
Cacti prefer warm temperatures during the growing season. Aim for daytime temperatures between 70-90°F (21-32°C) and cooler nighttime temperatures around 50-60°F (10-15°C). Avoid placing your cactus near drafts, heaters, or air conditioning units that can cause temperature fluctuations.
Step 3: Humidity
Keep Humidity Low
Cacti thrive in dry environments with low humidity. Ensure good air circulation around your plant to prevent excess moisture buildup. Avoid placing your cactus in humid areas like bathrooms or kitchens.
Step 4: Soil and Drainage
Use Well-Draining Soil
Always use a well-draining cactus or succulent soil mix to prevent water retention. Good drainage is essential to avoid root rot. If you’re using a decorative pot without drainage holes, place a layer of gravel or small stones at the bottom to enhance drainage.
Step 5: Watering
Water Sparingly
Cacti store water in their stems and are adapted to survive in arid conditions. Water your cactus sparingly and only when the soil is dried. Overwatering is a common cause of cactus health issues.
Step 6: Fertilizing
Fertilize During the Growing Season
Feed your cactus with a balanced, water-soluble fertilizer diluted to half-strength during the growing season (spring and summer). Fertilize once a month to provide essential nutrients. Avoid fertilizing in the fall and winter when the cactus is dormant.
Step 7: Pot Size and Type
Choose the Right Pot
Select a pot slightly larger than the cactus’s root system to allow for growth. Ensure the pot has drainage holes to prevent water from accumulating at the bottom. Terra-cotta pots are a good choice because they allow moisture to evaporate more quickly than plastic pots.
Step 8: Protect from Pests
Monitor for Pests
Regularly inspect your cactus for signs of pests such as mealybugs, spider mites, and scale. If you notice any pests, treat the cactus promptly with insecticidal soap or a mixture of water and rubbing alcohol.
Step 9: Seasonal Adjustments
Adapt to Seasonal Changes
Adjust your care routine based on the season. During the winter, cacti require less water and can tolerate cooler temperatures. Reduce watering frequency and avoid fertilizing during this dormant period.
Step 10: Repotting
Report When Necessary
As your cactus grows, it may outgrow its pot. Repot every 2-3 years or when the cactus becomes root-bound. Follow the same steps for replanting to ensure a smooth transition to a new pot.
Common Mistakes to Avoid
When replanting and caring for a cactus, avoiding common mistakes can significantly affect the plant’s health and longevity. Here are two critical mistakes to watch out for:
Overwatering

The Dangers of Overwatering
One of the most common and detrimental mistakes in cactus care is overwatering. Cacti are adapted to survive in arid environments and store water in their tissues, making them highly susceptible to root rot when overwatered.
Signs of Overwatering
- Yellowing or Softening: Overwatered cacti often display tissue yellowing and softening.
- Root Rot: The roots may turn black and mushy.
- Fungal Growth: Mold or fungus on the soil surface can indicate excessive moisture.
How to Avoid Overwatering
- Water Sparingly: Water your cactus only when the soil is completely dry. Insert your finger about an inch into the soil to check for dryness.
- Use the Right Pot: Ensure your pot has drainage holes to allow excess water to escape. If using a decorative pot without holes, place a layer of gravel at the bottom to enhance drainage.
- Seasonal Adjustments: Reduce watering frequency during the winter when the cactus is dormant.
Using the Wrong Soil
The Importance of Proper Soil
Using the right soil can improve drainage and root health, which are critical for cactus survival. Regular potting soil retains too much moisture, which can harm cacti.
Characteristics of Proper Cactus Soil
- Well-Draining: Cactus soil should allow water to flow through quickly and not retain excess moisture.
- Aerated: The soil should be loose and not compact, providing adequate air circulation to the roots.
How to Choose the Right Soil
- Specialized Mix: Use a soil mix specifically formulated for cacti and succulents. These mixes are designed to provide the drainage and aeration of cacti needed.
- DIY Mix: If you prefer to make your own mix, combine one part of potting soil with coarse sand or perlite and peat moss or coconut coir.
Common Soil Mistakes
- Using Garden Soil: Never use regular garden soil, as it is too dense and retains too much moisture.
- Over-Compacting Soil: Avoid packing the soil tightly around the cactus, as this can restrict drainage and root growth.
Caring for a Recently Replanted Cactus
After replanting your cactus, providing it with the proper care is important to help it acclimate and thrive in its new environment. Here’s how to care for a recently replanted cactus, focusing on monitoring growth and adjusting care as needed.
Monitoring Growth
Observe the Cactus Regularly
Keep a close eye on your cactus during the first few weeks after replanting. This period is crucial for the plant to adjust and establish its roots in the new soil.
Signs of Healthy Growth
- New Growth: Look for new spines or pads indicating that the cactus is settling in well.
- Firmness: A healthy cactus should feel firm to the touch. Soft spots can be a sign of overwatering or root issues.
- Color: The cactus should maintain its natural color. Any significant color change could indicate stress or health problems.
Check Soil Moisture
Regularly check the soil moisture by inserting your finger about an inch into the soil. It should feel dry before you water it again. This helps prevent overwatering, a common issue for newly replanted cacti.
Monitor for Pests
Regularly inspect your recently replanted cactus for signs of pests, which can quickly harm the plant. Common pests include mealybugs, spider mites, and scale insects. Look for white, cottony masses (mealybugs), tiny webs (spider mites), or minor, hard bumps on the cactus surface (scale). If you detect any pests, act promptly. Treat affected areas with insecticidal soap or a water mixture and rubbing alcohol. Use a cotton swab to apply the solution directly to the pests. Repeat the treatment as needed until the pests are gone. Regular monitoring and quick action can prevent infestations from damaging your cactus.
Adjusting Care as Needed

Modify Watering Schedule
Adjust your watering schedule based on the cactus’s response to its new environment. If the soil stays wet for too long, reduce the watering frequency. Conversely, if the cactus appears dehydrated or shriveled, you may need to water it more often.
Adapt Light Exposure
Ensure the cactus receives adequate light, but be cautious with direct sunlight, especially if the plant was previously in lower light conditions. Gradually increase light exposure to prevent sunburn.
Temperature and Humidity
Maintain consistent temperatures and low humidity levels. Avoid placing the cactus near drafts, heaters, or air conditioning units that can cause temperature fluctuations.
Fertilize Appropriately
Feed the cactus with a diluted, balanced fertilizer once a month during the growing season (spring and summer). Avoid fertilizing during the fall and winter when the cactus is dormant.
Report If Necessary
If the cactus outgrows its new pot or if you notice roots growing out of the drainage holes, it may be time to repot again. Follow the same replanting steps to ensure a smooth transition.
Provide Support
If your cactus is tall or top-heavy, it might need some support as it settles into its new pot. Use stakes or a supportive structure to keep it upright and prevent tipping.
What should I do if my cactus looks unhealthy after replanting?
If your cactus appears unhealthy after replanting, check your watering habits. Overwatering is a common issue; ensure the soil is dry before watering again, and reduce the frequency if the soil remains moist for too long. Conversely, if the cactus looks shriveled, it may need more water, but always let the soil dry out between waterings. Inspect the plant for pests like mealybugs, spider mites, or scale insects, and treat any infestations with insecticidal soap or a water-rubbing alcohol mixture.
Evaluate the light conditions, moving the cactus to a brighter spot with indirect sunlight if it’s not getting enough light or to a filtered area if it’s sunburned. Ensure you use well-draining cactus soil and the pot has adequate drainage holes to prevent waterlogging. Check the temperature and humidity levels, keeping the cactus away from drafts, heaters, and air conditioners while maintaining a dry environment. Inspect the roots for any signs of rot or damage, trimming and letting them dry before repotting in fresh soil if necessary. Finally, avoid fertilizing immediately after replanting; after a few weeks, use a diluted, balanced fertilizer during the growing season. Systematically addressing these areas can help your cactus recover and thrive in its new environment.
Conclusion
Replanting a cactus requires careful preparation, from choosing the right tools and pot to ensuring proper watering and light conditions. By avoiding common mistakes like overwatering and using the wrong soil, your cactus can thrive by providing the right environment. Regularly monitor your cactus for signs of stress or pests, and adjust care as needed. With these steps, you can successfully replant and maintain a healthy cactus, ensuring it flourishes in its new home.
FAQ
How often should I replant my cactus?
Cacti typically need to be replanted every 2-3 years or when they outgrow their current pot. Signs that it’s time to replant include roots growing out of the drainage holes or the cactus becoming top-heavy.
What if my cactus is too giant to handle?
For giant cacti, enlist help to avoid injury. Use thick gloves and possibly a towel or a carpet to wrap around the cactus for protection. Consider using a dolly or a sturdy box to transport the cactus safely.
Can I replant a flowering cactus?
Yes, you can replant a flowering cactus, but it’s best to wait until after it has bloomed to reduce plant stress. Replanting during its active growing season, usually in spring, is ideal.
How can I tell if my cactus needs more or less water?
Check the soil moisture by inserting your finger about an inch deep. If the soil feels dry, it’s time to water. If it feels moist, wait a few more days before checking again. Signs of overwatering include yellowing or soft spots, while a shriveled cactus indicates it may need more water.


